You're right. I have something special for you in more ways than one.
The person is special. The fact that she is guest posting is special.
I put out a call for some guest posts - long time readers know I do quite a few of those myself - and when I need a hand I know just who to ask.
But first I've gotta fill 'ya in on the state of affairs around the Ranch.......
You see we have company coming in a couple weeks and it's time to get serious about some things around here.
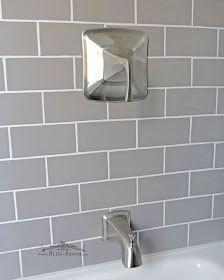
Like painting that Jack & Jill bathroom remodel we started months ago. Or sealing the grout on the awesome South Cypress subway shower tile so people can actually shower in it.
Also sealing the poured concrete counter tops. Washing the rest of the haze off the floor tiles.... hanging mirrors, electrical for lights, finish the plumbing, you get the idea - the list goes on and on.
And the most important thing; hooking the toilet back up. Yup, as you will read below what Linda says is all true, there is no pot to piss in!
Feeling overwhelmed with all the half done projects around here I gave my BFF a choice of a couple things, and having a working toilet for the visit won. Go figure.
So Brawn and I are kicking it into high gear to give our guests the best seat in the house while here on their trip. Wonder if I can get her to model it for you all?
While I crack the whip for project "Pot To Piss In" so my BFF can put her crack on the pot, I have a few blogging friends willing to share their projects with you.
Which leads me to Linda from It All Started With Paint. She is multi talented, and she wrote the book, at least the one on crafting with Mason jars.
She blogs - two blogs to be exact.
She sews, paints and she has an Etsy shop.
And she decorates her Chicago home with the best of 'em.
I'm proud to call her a friend, and one of my first in the blogging world. In many ways it is because of her that my blog is seen today, and at the risk of gushing too much about her, I'll just end with I luvs her and I know you will too.
Linda also has a wicked sense of humor, which of course appeals to me.
And she does something I can't do.......... sew.
Sooooooooo as a treat to my readers who hunger for not only a cohesive tutorial, but one that involves fabric (because they can't get either from me), Linda is going to show you how to make a pillow while I try to refrain from having potty mouth or cracking any more jokes. Yuk yuk yuk.
My very good blogging friend Bliss put out the call for help. Something about company and no pots to piss in and how she wouldn't have time to share a new project with you all....her lovely readers! Of which I am one. Okay, not saying I'm lovely or anything, but I'm definitely a Bliss Ranch reader.
And with the sharing of this easy envelope pillow cover tutorial, now I'm also a Bliss Ranch blog contributor. And I can check that off my bucket list. :) So here goes. With a caveat. I find trying to give a sewing tutorial a bit complicated. So I tried my best. Here's hoping it's something you lovely Bliss Ranch readers can follow ...
Envelope Pillow Cover Tutorial
Forget the Simplicity pillow patterns and just grab your pillow form and fabric. I wrap the fabric around the pillow form making sure there is at least a 4" overlap of fabric on the back side. Now it's time to cut. Since my pillow is a 14" x 14" square, I cut a piece of fabric that is 15" wide (this gives the pillow cover a nice, snug fit). And to keep it straight, I cut a few inches with my scissor and then grabbed both ends and rip it (this doesn't work with all fabrics, so test a piece first) .
Thanks Bliss for having me ... and I hope you get that whole pot pissing thing straighted out soon! ;) Oh, and here are a few more sewing and pillow-related projects you can find on my blog:
Thank you Linda for showing my readers there are actually people who know their way around a sewing machine. And like I said in the introduction, Linda is so much more than pillows, so please add her blogs to your reading list and stop by her Etsy store.


Good luck with the finishing touches. Went to the guest post's blog and spent way more time than planned, but learned about photography and selling one's home just for starters. Thanks for the introduction!
ReplyDeleteAwe, shucks. You made me blush! I'm honored to be here on this lovely Sunday (okay, first it was stormy Sunday but now it's sunny Sunday). You are so sweet and truly one of my most treasured blogging friend!!!! :)
ReplyDeleteGreat tutorial Linda! I can sew but I would rather SAW! :)
ReplyDeletegail
ps good luck getting your act together Bliss!
I like you both, and the fact that you teamed up to git 'er done is awesome. And I like anyone who's fluent in sarcasm. Way to go, girls.
ReplyDeleteIf I had a sewing machine, I would give those pillows a try. I would love to be able to make my own. Although, that could be dangerous since I already have plenty! Ha! Thanks for introducing Linda and letting her show us her talent.
ReplyDeleteI've got some pillows that need a'covering. Linda's tutorial will do the trick. Good luck with all of your projects, Bliss.
ReplyDeleteVery good!!
ReplyDeleteMy sweet pillow that I've bought on http://top10pillows.com/best-pillows-for-neck-pain. Try it too ;)
ReplyDelete