Sunday

The Essence of Chalk Boards

How about a quick little post to entertain a fellow blogger who is under the weather.  She is reading blogs while snuggled in her bed drinking Gatorade.  Sounds great huh?

I could do a post about all the food I have been making from my Pinterest board, but naaaaa, that would be sort of mean to Kelly who can't eat any.

I could do a little project to inspire her, but nooooo that would require ambition on my part, so that isn't happening today.

I could show you her chalkboard light fixture.  Yeah, that's it.  Kelly has this naked  chalkboard light that she's afraid to chalk on.  I think there is a support group for people like her with Chalkophobia, and if I applied I could probably get a government grant to study the disorder.  She hung the light in February so it's been MONTHS and she has yet to put chalk to the board.  So to wish her a fast recouperation, entertain her (and myself)  here are some picks for what she might chalk on her light.....

Below is Kelly's kitchen and her light, I  pirated the photo from her blog. Think she'll sue me?


Now have some fun and head over to Kelly's blog, The Essence of Home and leave her a get well wish with what YOU would chalk on her light shade.  I mean come on.... who buys a chalkboard light shade and never chalks on it?

P.S.  Just think, if you get sick and stuck in bed I could do a post about you too!


Follow on Bloglovin

Thursday

Part 3 The Tale of the Dog - He Glows

Part 1 and Part 2 of the Tale of the Dog can be found {here} and {here}.

As I explained in parts 1 & 2, Mo is doing well with kidney disease, defying the odds and amazing his veterinarian.

Our family went from having a big old dog who lived outdoors, to this shedding lazy hound who not only gets homemade meals, but pretty much gets his way about most everything.

Not everyone in the family has adjusted to such dog pampering, but Mo isn't complaining.

Glow in the Dark Dog Collar, Bliss-Ranch.com


Follow on Bloglovin

Wednesday

The Tale of the Dog, Part 2

When I left you yesterday in Part 1, Mo had perked up a bit, enough to smell steaks cooking and take a bite. 

The thing about this Puggle, which is a cross between a Pug and a Beagle, is that he has the nose of a hound.  He has all the Beagle traits which means he can sniff out food a mile away, and his stomach rules him.  So to have him not eat when previously he would lick the floor for a crumb was a most unusual thing, and also a good indicator of how sick he was.

The night he ate that small piece of meat was the beginning of his comeback. 

He still had to be tube fed, but more and more he was starting to have the urge to eat again and we believed we just might get our pup back.

Fast forward a couple months.... when he was finally ready to have his nose feeding tube removed, the problem was he could no longer eat any old dog food. 

I'm not going to go into all the specifics of kidney failure in dogs, but the two things that were important in his diet was the right balance of stuff in his food that was good for his kidneys, and the right ratio of the ingredients that were not. 

And water.  He needed to drink plenty of water.  This meant dry food wasn't gonna cut it.

Home made dog food

Purina makes a canned food for dogs with kidney failure that has to be purchased via the vet.  Mo did decent on that.... for a while.  Heck we were just happy he had an appetite and we didn't have to feed him through his nose.

Then he started to throw the Purina up.  Often it was a couple times a day, others it was once every couple days. 

We worried for a very long time he was relapsing, as dogs with kidney disease don't have a very good prognosis.  But he was usually eager to eat and that was a good thing - it's not his nature to turn down food.

I'm not a vet. 

I'm not a dog nutritionist

I'm not the dog whisperer.  But I have the internet and I know how to use it. 

I researched, then researched some more. 

I read stories from veterinarians, from people whose dogs had kidney disease and every opinion pro and con about making my own dog food. 

I read recipes from raw diets, to high quality top notch *expensive* dog food. 

I learned portions for his breed and size. 

I broke down what Mo needed in his special diet like I was a chemist - and I'll tell 'ya, science was not my best subject in school but frankly I was tired of cleaning up dog puke on my carpet. 

I did my homework on everything, and concluded I was going to start making Mo's food myself. 

Most veterinarians would frown on it, mine listened to me, and asked important questions.  When I could answer them better than she could understand, I knew I had schooled myself well.

Since Mo wasn't doing well on the only kind of purchased dog food he could have at that time, honestly..... what did I have to lose by giving it a try making it myself? 

My cooking hasn't killed anyone yet and in the big picture, dogs don't live all that long.

Home made dog food

Over the course of the first year as the Doggie Chef, I experimented with several versions/recipes.  Mo thrived on each of them, and I saved money because of course it was less expensive than canned. 

Currently I make a big batch in a roaster.  Like I said, I'm not a dog nutritionist, I just researched what my dog needed, so no recipe comes with this post - suffice it to say it's mostly meat, and if it didn't look so gross after it was all mushed up, I could safely eat it.  Any moms who have made their own baby food, it's the same concept, just a larger batch.

Home made dog food

A big vat of mushed up food. 

He doesn't leave my side when I take the roaster out.  He knows it's his food making day. 

My kids roll their eyes at me with all the fuss I go through for the dog, but somewhere between giving him hydration injections and pouring his meals down a tube in his snout, he became more than just the family pooch.

Home made dog food

After the roaster of food has cooled a bit I portion it out into daily servings in freezer bags then put the portions into larger ziplocks and plop them into the freezer. 

He gets half of one small bag in the morning and half in the evening equal to 3/4 to 1 cup twice a day.  I take out a couple days worth each time from the freezer.

Home made dog food

Mo is healthy now at 7 years old.

He gets his *fluids* checked regularly by our vet to make sure he doesn't have too much of this or that leaving his body via waste. 

Pretty good for a dog that 5 years ago wasn't suppose to live another year. 

I don't know for sure it's my cooking, but Brawn's been eating it for over 30 years and seems to be doing fine too.

If you are considering making your own dog food for whatever reason, I suggest talking to your veterinarian and doing research - what worked for Mo might not work for another dog. 

So what about the glowing collar you wonder? 

This dog food post got long so tomorrow there will be a Part 3 of the Tale of the Dog.

A first in the history of the Bliss Ranch blog - posting three days in a row.  Don't fall over, or get used to it.


Follow on Bloglovin

Tuesday

The Tale of the Dog, Part 1

What to blog about in the days between Halloween and Thanksgiving?

I don't have Christmas stuff out, not till after Thanksgiving so I won't be showing you amazing holiday decorating, and really I don't do much besides cook myself silly at Thanksgiving.

Home made dog food

I know what you're thinking.... 'Bliss surely you have some piece of furniture that you have recently transformed, to blog about?'.

Why yes, yes I do.

But I have a couple guest posts coming up and rather than give them a post about, say.... something like dog food and glowing collars, I'm going to use the furniture for that.

Home made dog food
 Dog food and glowing collars you say?  Umm hmm.  Meet Mo.  The ranch dog.

He started life out just like any puppy in a home with a bunch of kids.... being smothered with attention.

Till it came time to pick up his *stuff*.  Then he always belongs to Brawn.

It was in our vows, I don't do dog doo and apparently neither do most of our kids.

One year we gave #3 child a pooper scooper for his birthday.  Aren't we considerate parents?  He didn't think so.

With six kids running through the yard, a *stuff* free zone has always been very important.  Especially when the *stuff* was larger depending on the breed of dog that lived here.

Below is Capone who moved on when Mo was about 2 years old.

Home made dog food

This is our youngest, #6, with the oldie but goodie.

How the story goes is #2 daughter, (#4 child) asked me if she could get a dog.  NOPE, go ask your dad, knowing full well he'd say no.

Well that bit of advice along with the answer given, came back to haunt one of us.  Since I love that dog almost as much as my husband you can guess which one of us regrets saying yes to daughter #2.

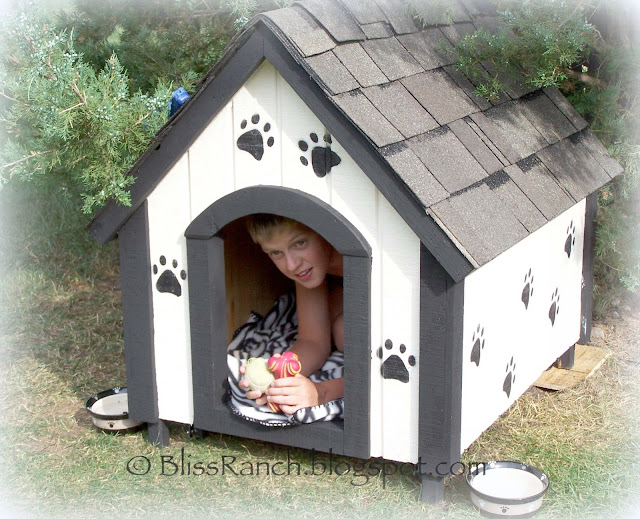
Brawn built Mo a dog house.
Home made dog food

We had to trick Mo to get him in it.

His home has since been turned into a duck house when the crapping quackers were just chicks, and Mo has a prominent spot at the end of our bed.... my side of course.

Home made dog food

But Mo isn't really my dog.  He is suppose to belong to #4.

Right about the time his predecessor moved on, Mo got really sick.  Really really sick with kidney failure.  I didn't even know dogs got things like that.

Our vet sent us to the last hope animal hospital where they gave us the grim news.... we "might" be able to save him, but it would be costly.

Mo stayed over night to re-hydrate and we collected him the next day, basically taking him home to die.  The approximate ten thousand dollars they figured it would take to "maybe" keep him alive was not in my budget, so my daughter and I cried our eyes out and took him back to our local vet the next day.

Our vet knew the outlook was bleak but she gathered some supplies to send home with us and my daughter and I listened to the instructions on how to nurse him back to health in the rare case he could make it.

Home made dog food

We fed him a special liquid through a tube in his nose.

We hydrated him by injecting a bagged solution into him - yes with a big long needle - into the skin at the top of his neck.

I learned a lot, mostly about what I was capable of doing when I was determined.

A month passed of this routine as care giver to the hound.

He wore the cone shaped hat all that time so he didn't pull out the tiny tube that was first taped on his forehead, then super-glued to his fur so it would stay in.

He had no appetite.  All he did was sleep, he was like an old soul waiting to take his last breath.

During that month he got very comfortable as a house dog.  I was on a mission to nurse him back to health but we knew he couldn't go on forever eating through a tube in his nose.  We offered him his favorite things, but he looked depressed and had no interested in eating.

Then one evening he started to sniff the air as we grilled steaks and that night someone at the table dropped him one very tiny bite.  He sniffed it just a bit and gingerly ate it.

That gave us hope that his appetite might turn around.

And it did.

~~~~~~~~~~

Tune in tomorrow for part 2 of the Tale of the Dog where you will see Mo's amazing glowing collar and an electric roaster full of home made dog food that looks pretty gross.  You don't want to miss that!


Follow on Bloglovin

Thursday

Dresser redo: Virginia Chestnut Meets Georgia Clay

Being the indecisive and color challenged gal I am, I picked some of CeCe Caldwells paints in earthy tones and ordered sample pots from A Little bit o' Shizzle.

I also ordered a quart of my most used color, Virginia Chestnut formally known as Hershey Brown, (of which I will continue to call it).  In addition I ordered a gray color that is soon to go on my pine buffet.  That's if I ever get the urge to paint again.

Ordering paint was about where the fun stopped, if there ever was fun in painting for me!  I have tried to block out the process of taking this $20 garage sale dresser from a golden oak color to a CeCe Caldwell Chestnut brown.  The journey was painful.  Everything that could go wrong did and I won't relive it here.  Painting and me do not agree.  A simple process that took me three times as long as it should to complete, with more layers than I care to remember being painted on.  I think I ended at 6 before I decided to quit.  The dresser is done, not matching my vision but I like it anyway.  Had to quit, I ran out of paint.

I have not picked up a paint brush since.  A month now.  I need color therapy.  I am challenged.

I was looking to replace a very nice Amish armoire that matched nothing in our bedroom but has housed my underwear for 25 years.  I wanted the right size dresser to replace it but I didn't want to spend much (= cheap).  This heavy Basset one with the cheap price tag worked, and with all the seats down it fit in the back of my vehicle.

It was however just a bit too short for my vision. 

I brought it home and asked Brawn to make an apron around the bottom to raise it up about six inches.  Of which he did, no problem.

In the meantime I also found these old shades that I ripped the fabric from their frames.  Doing this is now on my list of things I hope to never do again.  They use Cheerios glue to keep the fabric on.  You know what Cheerios glue is don't you?

The shades were a buck each, and I was putting them on my $1.50 chocolate ginger jar lamps.  They are still naked, waiting for shade inspiration to hit.  And waiting......

All was going well.  Georgia clay sounded like the right color.  Not too orange.  Layered with the Hershey.  And some white.  It's amazing how far one of those little sample pots can go.

And it's also amazing how far a quart can go when it mysteriously spills in the driveway.  Yes I dipped my brush right in the puddle to paint.  I now had limited sample pot paint and limited quart paint.  The only ones home when the spill occurred were chickens and ducks.  You think?.......nawww.  Had to be a squirrel.

Pay no attention to the orange dripping from that other can.  Brawns attempt to help me involved giving me some bright jail house jumpsuit orange.  Not.  Helping.  Leave me alone.

I tried some creative ways to stretch the paint.  They didn't work so I'm not going to bother to explain how stupid I can be.

I waxed it in the house wishing to leave the driveway and the bad memories behind.  Somewhere in there I realized I needed a coat of white for when I sanded it to get the look I wanted.  Again, don't ask how I did this.  Trust me I am not on to any new technique.

 Below you can see what a difference waxing makes.  A before and after of dark wax -   the drawer on the right has no wax.  Wax I have plenty of, thankfully.

Distressing brought out the areas of white and the Georgia clay.

I reused the original hardware.  Did those twice too, yup, umhumm.  First I Rub n Buff'd them and they looked too shiny and new, so I sprayed some other hammered look paint on them and sanded it back to age them more.  Didn't think they were ever going to dry.


The mirror was from a garage sale as well, and it's one of those really heavy ones you don't want landing on your toe.  $10.00 - already the right color I just had to distress and wax it.

 A metal bin of Autumn splendor.  (No I do not talk like that in person).

So whooooo says you can't find anything good at garage sales?  I got the owl at the same sale as the dresser.  $3.00.  I know owls are all the rage, but I don't really like most owls.  This one I do.  For Fall.  After Thanksgiving he's going in the closet.

The dresser is much darker in person, which was good, it needed to match our dark bed.  So in that regard, mission accomplished.

Everything is thrifted.  Would of been a cheap makeover if that paint didn't mysteriously land on the driveway.  And being truthful, if I would have listened to advice from two different places (one of which being my husband) the parts I did not recap for you would of gone much more smoothly. 

***Comments on this post have been turned off due to spam.  I would still love to hear from you, so drop me a note via email.
Linking the dresser redo, redo, redo at:
Live Laugh Link @live.Laugh.Rowe 
POWW @ Primitive&Proper 
Wow Us Wednesdays @SavvySouthernStyle 
All Star Block Party @FullCircleCreations 
Creative Inspirations @EmbracingChange 

Treasure Hunt Thursday @ FromMyFrontPorchToYours
Under $100 Link Party @BeyondThePicketFence
Transformation Thursday @TheShabbyCreekCottage 
 Open House Party Thursday @NoMinimalistHere 

Catch as Catch Can @MyRepurposedLife 

The Dresser Beast was Featured with Cassie at POWW at Primitive&Proper


Follow on Bloglovin

Monday

Halloween Wrap Up

Since Halloween is tomorrow I figured I better get the last October post in so I can move on to completed furniture projects and then Christmas decorating.

 I got lucky at a thrift store the last time I went.  You know, lucky as in there was actually something I wanted.  Forget the weird prices of $1.91, all I saw was glass that could be turned into cloches.


 The tall one fit on a metal candle holder I got somewhere else, so I just stuck in a wood candy corn.  I will use both these for Christmas decorating somehow.


When we open up our dining room table to seat more than 6, the light is way off center.  We put this branch and birds on it Saturday to balance it out.  It worked so well I'm thinking of putting turkey's and leaves on it for Thanksgiving dinner.


I have had these dollar store skeleton hands for years, they are glued on to rocks to hold place markers.  This is one of the names of the Mystery Dinner guests, it's a fake name because they are all fake people.  Well... real people who arrive in the character of a fake person. 
In real life I don't know anyone named Margo. 


Fortunately I have quite the supply of plates for smashing into mosaics.  I just go out to the garage and look for a color or pattern and make due with what I have for what the occasion is.  I chose white, black, and a dark pattern in keeping with the Halloween theme.  Maybe next year I will do a Halloween mosaic project and smash these plates.


My daughter helped me set the table and we wanted the ghosts on the napkins to look like they were floating up off the plate so we just sort of made our own folded tee-pee and plopped it down in the center of each plate.


I made a few more of the light-globe pumpkins to use as a centerpiece and put dollar store battery lights inside them.  I plan to use these for thanksgiving too.

I also used the Recycled Name Plate Tags I made to mark decalf, regular, creams and other coffee flavor stuff.

I didn't carve the pumpkins, but the masks were my attempt at the cute ones I've been seeing on the internet.  We lit all the pumpkins and grouped 5 of them in two spots with a 6th on the porch.

 This bottle was a gift from some friends, they thought the old bottle was pretty cool and thought I would like it.  It has it's original liquid inside. 

I would love to see if anyone can guess what kind of a bottle this is.

I had a good time Saturday night and I hope my guests did too.  It wasn't as easy as I thought to cook for 12 and also be a character in the mystery dinner.  The next morning this is what I looked like...............
Happy Halloween


Follow on Bloglovin

Sunday

Projects That Go Bump In The Night

Last Sunday feeling a little deprived and depraved because I had no Halloween party to plan this year, I decided to get my spooky on by hosting a Mystery Dinner for a group of 10 friends.  In anticipation of their arrival I went to my Pinterest board to see what I had pinned that I actually thought I could accomplish on a weeks notice and still leave me time to clean my house, set up and cook.


First up was converting a couple of Good Will silver trays into chalkboards.  Brawn cut out two pieces of thin plywood to fit the bottoms and I painted them with chalkboard paint. 


You might recognize the brooms, they have been all over the internet, but I got the inspiration right from InspiredByCharm.  Michael did a whole wall.  I was pretty proud of myself for freehanding the brooms and I intended to go back and write the *names* like his, but never got back to it. 
 
After I saw an amazing haunted dining room at BeauxR'eves,  I knew I had to copy her Madame Leota from the crystal ball in the Haunted Mansion at Disney.  I didn't get any photos of Ms. L. last night - you know I got busy enjoying my guests and not once picked up the camera - but I stuck a couple glow sticks in her skull and she looked pretty creepy, and I loved it.
 While you are admiring Ms. Leota's beauty, look on top at the bird.  I also copied Shannon at FoxHollowCottage(If you are keeping track that is three copies so far in this post).  Shannon tore apart a simple stainless steel scrubbie (.50¢ each at the dollar store) and used it as nest filler.  Yeah, I pinned that great idea and then did it. 

The Eyes Have It
My absolute favorite project last week was the Paranormal Portraits that I copied from Tracy at CrowsFeetChic.  I took a few photos from the internet, and the rest were photos of the guests at the party that I turned into black and whites.  Cracked. Me. Up.  Third person from the right is Dii, my one BFF who knows I blog.  (Hi Dii).  I had plenty of frames, just took out the glass and got lucky that the lights stuck right in without tape.  I think the secret was foam board as the mat.

Eventually I will get around to doing a post about the above dresser from helll redo.  That monster of a dresser keeps showing up in my posts but the horror of it's conversion is still too fresh in my mind and I just can't bring myself to blog about it just yet.  I hope you understand.  I'm traumatized and may never pick up a paint brush again.

Last, lest you think all I do is copy everyone, I do have something that I didn't copy.  My oldest daughter is a stained glass artist.  She worked in that trade for I forget how many years six maybe?  Before she left, she took me to the studio, and since she got the patience gene in our family, was able to teach me how to make a simple project.


Yes that is a glass block stuffed with a string of half lit orange lights.  But no, that is not a sticker on the front or around the edges.  That BOO is cut out of stained glass, and the edges of the block are done in mosaic with the pieces and grouted.  I love it, but mostly I love it because I got to spend the day with my daughter.
Close up of the edge

The glass block works as a night light till Halloween.  I should make a stained glass Christmas block.  I wonder if my daughter has any patience left to do another one with me?


Follow on Bloglovin
BB
Disclosure Policy for Bliss Ranch:
From time to time there might be a written review of services or products on this blog for which Bliss Ranch may or may not have received that service or product for free. Receiving a product or service for free or at a discount will never dictate what is written on this blog or guarantee a favorable review. All opinions here belong to Bliss Ranch and Bliss Ranch alone. Bliss Ranch is not monetarily compensated to write anything on this blog... period! For the complete privacy policy please see the tab at the top of the blog.