Sunday

Paranormal Portraits

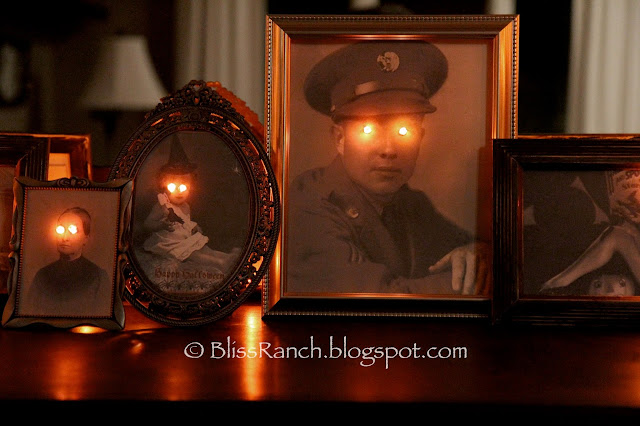
Last year when Tracy at Crows Feet Chic posted her paranormal portraits, I knew I had to make some.  And I did.

Paranormal Pictures for Halloween
Bliss Ranch Haunted Portraits

This year I knew I had to make more.

But this time they won't be in my house on the dresser, they are hanging in the back shed on some old barn doors as decoration for a Halloween party.

The wood is from old barn doors at Albert's farm.  Last week I made a coffee table out of one.

Gallery Wall for Halloween

Wondering what that stump of wood is for?  Hammerschlagen.  It gives the men something to do while they drink beer.

There are up to 5 couples that host this party, so I used pictures mostly from past parties to turn into the haunted ones.  The larger ones were made 24x18 at Staples - engineer prints, all three for under $6.00.

Haunted Portraits Bliss-Ranch.com

I collected frames from garages sales, and my spending limit was .50¢, but the nicest one is the big one bottom center and it was free.

The one on the bottom left came with a hand painted portrait of a little boy from 1958.  So I just used some paints on him and turned him into a little vampire. 

Haunted Portraits Bliss-Ranch.com

 This one is so creepy it's not funny, and yes that is another of the hostesses.

Haunted Portraits Bliss-Ranch.com

Need a tutorial?

Take all the glass out, poke holes in the eyes with a screw driver - all the way out the back of the cardboard or whatever backing came with the frame - push the lights through from the back and hang up.

If you are lucky like I was, your Phillips screwdriver is the perfect size and the lights punch right in and stay in place.

DIY creepy Halloween Portraits, Bliss-Ranch.com

Halloween Gallery Wall, Bliss-Ranch.com

In person they are pretty funny.  A few black lights in adjacent areas for ambiance and it's just about ready for a round or two of Hammerschlagen.


The eyes are watching you from these link parties:

Tutorials Tips and Tidbits @StoneGable
Treasure Hunt Thursday @FromMyFrontPorchToYours 
Twirl & take a bow Link Party @ArtisBeauty

Follow on Bloglovin

Tuesday

Junkers Unite! Barnwood Table, Pinboard & Link Party


Allow me to introduce you to some Funky Junk people, some Funky Junk pin boards and my junky barn wood coffee table......

Barn Door Wood Table, Bliss-Ranch.com


Follow on Bloglovin

Saturday

Quick set Concrete Pumpkins

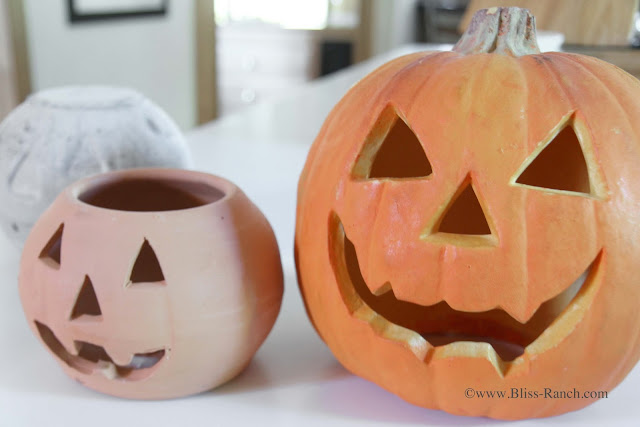
Over at Fox Hollow Cottage I spied a guest post from Shayna at The Wood Grain Cottage for some concrete pumpkins, and I knew right away I was gonna make some.  Using quick set concrete was right up my alley since I now have three little stone look walkways made over summer using the stuff.

Quick Set Concrete Pumpkins Bliss-Ranch.com
Terracotta pumpkin, and thick foam light up pumpkin with his electrical removed


Follow on Bloglovin

Friday

Halloween Party Invitations


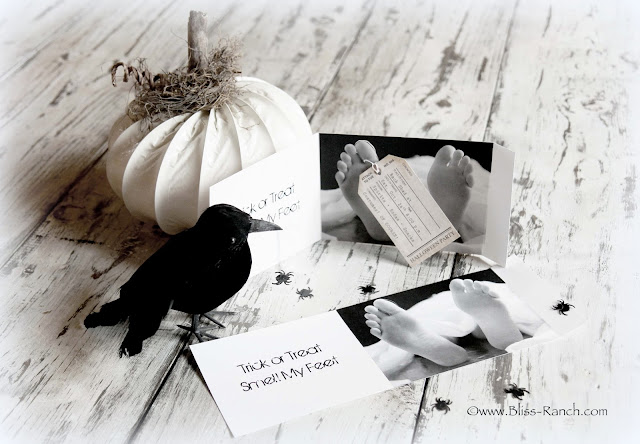
Toe Tag Halloween Invites

How to make toe tag Halloween invitations, or, I could very easily start this post out  "It was a dark and dreary day.....".  The sun is not shining, the clouds have gathered and are dropping rain on my parade.

Pisses me right off.

I've got things to do outside and not enough time to do them.

Tape from Target, Scrap-booking isle
So instead I decided to finish up invitations for a Halloween party.

I had the black and white part of the invitations printed at Office Depot - .18¢ each one sided and I had two on a page.  Cardstock.  I needed 55 copies.  This party has 5 hosts, everyone invites friends and family.  Office Depot was better than printing all those copies at home, $10 bucks divided by 5, very reasonable.

And my labor is free, I assembled them all.

Office Depot wanted $1.29 a copy for the tag part, considered "color copy" which has seven on a page.  I needed 16 sheets and decided to print those at home on the card stock I already have.

Cheap.  Yes that is me.


I can't take credit for the whole idea of making toe tag invitations, but I did have my own ideas for how I wanted mine to look.


First find some feet and a helper to make the foot model laugh while they are suppose to be holding still, because even though there are feet photos on the web, I didn't want to pirate them.

I needed authentic Bliss Ranch feet for my invitations.

My foot model will remain anonymous, because you know she hadn't washed and smoothed her piggies and was basically mortified to have photos taken of them.

It was the foot models idea to use one of my hammered tin platters to mimic feet on a cold metal gurney.  I added a black blanket to cover her as well as the headboard on my bed, and an old sheet, then I snapped away.

I ended up with this.....


Because two sided printing costs more, we wanted to keep the lettering and photo on one side, and opted to just fold the info into the inside.  The folds all needed to be "scored" in two places, and I did all those suckers myself, but it was worth it because it creates a nice crease for folding.


I used the exacto knife blade-up for scoring, and blade-down for cutting around the big toe.  I wanted the tags to actually hang on the toe, I like the 3-D effect.

Toe Tag Invites

The most tedious part of this whole process was tying the tags on.  I used dental floss, the waxed kind so it was stiff and easy to put through the tag, then a piece of regular tape on the back side to keep the floss on the toe.


They were each folded and sealed with the tape.

Stuffed into envelopes I picked up last spring at a garage sale that was selling office supplies.  250 for a buck, and I sized the invites around being able to fit in those envelopes.


I like how they turned out.  I stamped on a spider, because I like to use ink pads. Really I do - I like the sound of the THUMP onto the paper.

The tags have info on both sides.  Host names, details on the front, and address and phone numbers for questions on the back.

Toe Tag Party Invites

And "Trick or Treat Smell My Feet"
 is just funny.


Treasure Hunt Thursday @FromMyFrontPorchToYours
Halloween Blog Hop @ TheHappieHousie
Wildly Original Party @IGottaCreate 
Halloween Spooktacular Party @MadeInADay
Link Party Palooza @IHeartNaptime
Halloween Project Parade @OhMyCreative


Follow on Bloglovin

Sunday

Junk in the Shed

At this time of year there is a lot of outdoor chores to do before the snow flies.  And when we decide to have a Halloween party, well that ups the chore ante.

Brawn had me wander with him back to the out-of-sight out-of-mind shed at the edge of our woods to "discuss" the upcoming party and the "junk".

Previously the shed was used to store the boat, lake stuff, lawn furniture, a camper, and the sawmill boards Brawn has on hand for building new things.

2 years ago it was his shed.......

Before I started hauling home every free item I saw.

A bucket at the end of a driveway marked "free", full of dusty bottles and greasy insulators.  I think there were about 8 of each.
It was before people started telling me about free stuff they found.....


Like a roll top desk my son spotted by a dumpster at a business.  First he told me about it, then went and looked.  After he checked it out he called and said he didn't think I'd want it. 

Some stuff is from garage sales like this old headboard.  Five bucks........


I have a buggy seat?  Hey I forgot about it since it went to live in the shed when we cleaned the garage.

A friend brought over the copper tub a couple years ago saying she thought I could do something with it.

Old cabinet doors Brawn hauled home for me before my addiction became serious.


Half a door and an old table top.  

Sewing machine base I was gonna do something with.  The same friend that gave me the copper thing brought two chairs and left this for me too.  


One window or 20..... 


Below the Electric Chair, are two dressers waiting for a redo.

What?  You don't have an electric chair? 

I stuffed a jailbird body and people stuck their head through the black fabric and we took pictures of them at night.

The head model is one of my sons. The one that hates all the old junk around.  I think some of those old belts are now on his little brothers Rock & Roll Dresser as handles.

Not all the junk is IN the shed.

We have piles outside too.


Don't ever tell my husband you want some old wood, because he will get your some.  And don't ever walk on this pile or you'll end up with a rusty nail in your foot.  Then we'd have to cut your foot off and use it as a Halloween prop.


Speaking of rust, there is rusty stuff besides nails around too.

If you came to our house you would never know all this junk is lurking. THANK GOODNESS!!!!  Keeping it out of sight helps our property not look like the Beverly Hillbillies moved out and left us their stuff, and it keeps my addiction on the low down from friends.

Really the back shed is a treasure trove of junk waiting for its moment.  But the moment will have to wait till after October.  For now junk will get hauled out so the shed can be transformed into something with a Halloween atmospfear.  I'll be flying in on a broomstick.


(Hi Dii, hope you are up and around soon.  I need more junk!)


Follow on Bloglovin

Monday

Mum's The Word

I needed to thank someone who thanked me for something.  You know... the thank you thank you type thing.  I did something for someone last Winter not expecting anything but a thank you, and instead I received a $50 gift card to a nursery.


I decided when I used it, I would also get something to thank the thanker.  I waited till the mums were plentiful and bought myself some and one to thank her.

I didn't want to just send it like it was, I mean after all it's a thank you for a thank you.  A bare pot wasn't gonna cut it.

Big mum's fit nicely in big plastic caldrons, and I happened to have one sitting at my feet that I picked up for .50¢ at a garage sale last week. 

I grabbed some left over burlap coffee sack scraps (why didn't I throw those away?) from the torture I put myself through making coffee sack pillows, then knotted the pieces together and just tied it along the top.

The tag is printed on an encyclopedia page and secured on cardstock.

DONE! 
The best part is she is not expecting to be thanked for thanking me, so she will be surprised.  Now I hope she doesn't think she has to thank the thanker for thanking her as the original thanker.

My son is suppose to drop it off for me but he goes out the other door and forgets about it so it has been ready to go for two days.  Maybe tomorrow.


And look what my son in law brought me. Two spools.  What shall I do with them?


Follow on Bloglovin

Sunday

Celebrating Everyday Life Magazine

I was given the opportunity to have a peek at the Fall digital issue of Celebrating Everyday Life Magazine from Jennifer Carroll.

There's some pretty awesome stuff inside the covers.

Stuff like... the cover itself!  The cover gave me an idea to add chicken wire to my next wreath.

There are photos that remind me I want to host an outdoor dinner on the patio this fall.....


It also reminded me to tell Brawn I want an outdoor fireplace just like that one.

Photos that show me I can put together crafts that are simple enough for me to do, with big bang for little buck.....


And I've been collecting plastic pumpkins the past two weeks.  Sometimes they are in the free bin at garage sales, and just look what they can be turned into.....


The magazine photography is really beautiful and has everything from warmly decorated rooms and ideas, to interesting interviews.  You can have a preview yourself by clicking right HERE.


Follow on Bloglovin
BB
Disclosure Policy for Bliss Ranch:
From time to time there might be a written review of services or products on this blog for which Bliss Ranch may or may not have received that service or product for free. Receiving a product or service for free or at a discount will never dictate what is written on this blog or guarantee a favorable review. All opinions here belong to Bliss Ranch and Bliss Ranch alone. Bliss Ranch is not monetarily compensated to write anything on this blog... period! For the complete privacy policy please see the tab at the top of the blog.