I had never seen or heard of such a thing before she introduced it.
I was intrigued.
I was also not near a craft store at the precise moment I wanted to try the product, so I made do instead.
Making do meant making one.
It's done with paint and without sanding.
It's a pretty nifty little thing and works great.
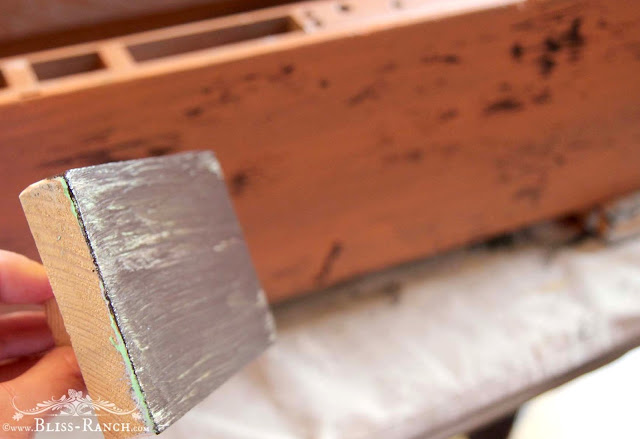
The concept is simple; put a light coat of paint on the wood block and drag it across the item you want to have a distressed or layered paint look.
It works wonderful on a flat surface as well as the edges of a project.
The first time I tried out the idea I didn't have a wood block (which really means I didn't want to hunt one down in the garage) but I did have a wood slat, so I used that.
I simply put a light coat of paint on the slat and pulled it around in the areas I wanted a bit of distressing.
The slat worked fine but the shape was a bit cumbersome, however it worked good enough to convince me of the potential, and it was a lot easier and less messy than sanding.
Earlier in the week I posted this old tool tote that I transformed into a pretty nice table centerpiece, and I used the wooden drag on it in a variety of Fusion Mineral Paint colors.
If you want distressing down to bare wood, of course you would still have to use sand paper. The drag adds paint in whatever colors you choose, to give a layered look.
This nifty little homemade wooden paint drag took only a couple times to get the hang of it.
I'm going to make more in different sizes, smaller for smaller projects, maybe larger for bigger ones.
Maybe I'll even get creative with different textures on the drag itself.
There will definitely still be times where nothing gives me the look I want other than using sand paper, but for smaller projects or ones where I just want a little paint layering or distressing on the edges, using the wooden paint drag will come in very handy.
Oh.... and if you don't already stop on a regular basis at Organized Clutter, do so - Carlene is always re-purposing something and she is full of interesting ideas.
Subscribe, Bliss Ranch arrives magically!
|


This is such a great idea! I DO hate to sand to distress things. Did you just glue or screw the handle on the block? Thanks for sharing this...I am pinning it now.
ReplyDeleteThis is such a great idea! I DO hate to sand to distress things. Did you just glue or screw the handle on the block? Thanks for sharing this...I am pinning it now.
ReplyDeleteGreat way to add more character with paint and with no mess. :)
ReplyDeleteThanks for the mention!!!!! I love my layering block.
ReplyDeleteI am definitely gonna try this! I love the look and the fact that I don't ha e to make a mess sanding...
ReplyDeleteMaking one today! I wanted to try it when I saw Carlene's and thought it would be an easy build but wasn't sure it would work. Thanks for trying it out for me and now I'm off to create one for myself! Thanks lady!
ReplyDeleteThis is a great make-do idea, Bliss...I love the look you got with it! Carlene is always doing something fun...and she has the most beautiful gardens!
ReplyDeleteThat's a great idea! There have been times when I wanted a distressed look but the under layer of the paint wasn't in the right color. So, I didn't want to use sandpaper. I will keep this in mind for future projects.
ReplyDeleteI need this in my life. I've never even heard of one, but the results look so authentic!
ReplyDeleteI'm not sure how I missed that part in Carlene's post... guess I was too busy being shocked at her decadent project to read any words! :)
Thanks for creating this post, Bliss! Doing this!
Great idea. Now you could go into the "layering block" business and make yourself a fortune....just an idea!
ReplyDeleteHope you have a great Sunday and have fun 'layering'. xo Diana
Great idea! Cant wait to try it!
ReplyDeletei wish i was good at these types of finishes. the fall box looks amazing.
ReplyDeleteThis is the coolest thing I have seen in ages! I would never have thought to try something like this. Making my own too. Thanks for sharing!
ReplyDeleteI saw this technique on Flea Market flip a while back. They used it on unfinished wood and it worked well. Glad to see your experience. Cute tote by the way.
ReplyDeletehmmmm I will have to remember this little trick. First I've heard of it. I'm surprised I didn't see it on Flea Market Flip as Karen mentioned.
ReplyDeleteThanks for sharing Bliss, love the tote colors!
gail
ps pinning
hmmmm I will have to remember this little trick. First I've heard of it. I'm surprised I didn't see it on Flea Market Flip as Karen mentioned.
ReplyDeleteThanks for sharing Bliss, love the tote colors!
gail
ps pinning
I've never heard of this either. Cool trick!! I love the tote, but you know that!
ReplyDeleteThanks for creating this paint dragging tool. Going to make a few. So handy, can't wait to try!!
ReplyDelete