Monday

Wood Scrap Art

Wood Scrap Art and A Poured Concrete Top

Wood Scrap Wall Art Bliss-Ranch.com

Our family room got an update a couple of Christmases ago. 

The males, (ok, really it was me) wanted a new television because glare from all the windows makes watching the old one impossible during the day. 

Not that I watch much tv in daylight or nightlight, but when a special little boy wants to watch Power Rangers, I'm not telling him no.

                                 The Big 'Ol Dinosaur                                     


The big-dino was built to house the big-dino-tv, obsolete these days huh?  The cabinet above it stores more junk than you can shake a stick at. 

And I'm a short stick. 

I couldn't reach the top shelves in the cabinet to do more than pop in a cd, if I could find or reach the cd in the first place.

During
After Christmas the new tv sat on a toy box for a few months till I ordered a hanging bracket for the wall. 

I sort of liked that the toys were held captive and not on the floor. 

When the old tv cabinet left, it also left an empty space above the new tv that I was going to have to put my thinking cap on to fill.  Light pours in this area till the sun leaves the sky - makes for a bright happy space (hard to take photos in).

Poured concrete top
Brawn decided to reuse the old wood from the tall cabinet to make a shorter one and do a poured concrete top with a rough edge for a rustic look. 

That's his style.  Rustic, not rough.

This was totally his baby - he didn't consult me, a rare occurrence and one that is usually not a good idea.

Rustic concrete edge
He stained the concrete with acid stain in some earthy colors and dabbed some on the edges.  The chiseled edge mimics one you might see on granite.

Shrunk down with the same wood
Everything here is reused from the original cabinet, except the new concrete top and the cabinet wire, but that's left over from a chicken coop.  Inside is a Wii, all the Wii games and controllers, stereo, and I forget what else.  If I ever make it purdy I'll show 'ya.

The original idea was to have the sides look like the ends of vintage wood crates with
interesting vintage product advertising, stained onto the wood.  

That was to be my job.  I haven't got that far, and between you and me, I don't know when I will.

Notice the cute pillow on that little chair?  Linda from It All Started With Paint sent it to me.  I was a lucky duck recipient of the Pass It On Project
I have been eying up lots of blogland ideas and decided in the interest of no cost, to use what I had to fill the area above.  I pinned an idea from Sweet Serendipity as inspiration.

I would love to say I raided Brawns well placed wood scrap bin, but really all I had to do was look on the floor under his saw and brush away sawdust to find scrap pieces I could use.  Our garage is famous for it's mess.

I set to work.  I used a combo of stencils, stickers, or made my own letters to paint everything.  The Grandpa & Grandma sign was a gift, and it seemed like a perfect fit.


I arranged and rearranged and finally got an order I liked.  We ran a piece of tape down the middle, with a line down the center of the tape, so it would all line back up once the first piece was nailed to the wall.  At about 10:00 at night because I was anxious.


I painted the wall with the paint can closest to me, which was still sitting out 
from a project a month ago.  It's the same color as on the outside of the front door here.  Dutch Boy, "Earth Matters".

The wall is empty no more and the leaves are green outside once again.


Linking the Scrapy Wood up to:


Saturday Night Special Reclaimed Wood @FunkyJunkInteriors
The Mother Lode @ I Gotta Create 
Crafty, Scrappy, Happy Me @ CraftyScrappyHappy
Pin'inspiration Thursday @ JanesAdventuresInDinner 
Inspired Creations @ Embracing Change 
Party Time @ 36th Avenue 
Open House Party @ No Minimalist Here 

Featured at:

Follow on Bloglovin

Copy Cat Cloche

Mine
Nah nah nah nah nah .... copy catter, dirty ratter......

Cloche to copy from Okio B. Designs
 Technically this is not a magazine copy, it's a blogger copy.  I wanted to copy all the magazine cloches I found but most of them use amazing tall beautiful cloche's.
I have two small squatty cheese domes.  

As the last person in blogland to own a cloche, I was super excited when I came across not one, but two of these cheese thingy's at garage sales last week.  One was darn near free (fill a bag for a buck) the other was a buck.  So lets just say they were each .50¢ and I came home with a bag of junk that I don't know what to do with.


I got to work painting with what was left of my Annie Sloan Old Ochre sample pot and even had to add water at the end to eek out enough paint.  Sand to distress and wax, Ive got that drill down pretty good these days.
Done painting, now what?  
I was going to put one of them on a base and bought a little milk glass style vase to glue on.  But didn't get around to that.  Maybe after I finish this post.

 The glass dome on the left is really heavy.

Enter the magazine copy cat challenge at DebbieDoos my favorite link party because I can find something and copy it.  Don't need any special talent like thinking up something.  Easy.  Except this challenge took me longer than anything because I had to look at every single cloche photo I saw.  I wanted to do a chocolate cake copy since daughter #2 made chocolate cake yesterday.

I wanted to do this.......

Not this........


 So instead I did this........

Because I looked at photos so long I missed the party!


Linking to:
Summer Cloche Party with Marty @ AStrollThruLife


Follow on Bloglovin

Thursday

PillowPalooza Party


Isn't that just the coolest name for a link party?  Pillowpaaalooooozaaa.  It has to be cool to get me to attempt pillows.  If you've been around for a while you know I don't sew, but hey a couple months ago I told you I can't paint either and no one believes that anymore, not even me!  But really, I can't sew.  It involves math, and accurate measuring and if your me, seam ripping.  Burlap is very forgiving in two of those areas.

So Linda at ItAllStartedWithPaint along with Kari at ThistlewoodFarm are hosting this Pillowpalooza party.  I wanted to make some pillows to jazz up the joint before my son's grad party.  I fully expected I might be linking some pillow flops, but I LOVE my pillows. I Love them!  L.O.V.E. them I tell 'ya.  My mom might even be smiling down thinking there is hope for me and my sewing abilities yet.  Ummm probably not mom, were you watching when not once but twice I tripped over the cord and then tried to sew with the pillow already IN the burlap?

First thing I had to do was borrow a sewing machine.  This one worked like a charm even though it clearly isn't a new model.  I got out the directions to thread it, and it was like reading Greek to me, but it was sort of like riding a bike.... I got right on and went back to home-ec class 40 years ago.  I also prayed the already loaded bobbin held out.  It did.  The lady who sold the machine to my daughter in law had her name on the instructions.  Florence.  Florence also had her name on the foot pedal and machine. 


I had all those burlap sacks left from my breakfast nook valance making task, and I have seen all those amazing pillows you ladies make from burlap.   I was fairly confident I could sew a straight line.  I took some teal paisley pillows, (don't be jealous) and just cut the burlap bigger than them and stuck it inside, paisley and all.
You know you want this fabric, admit it


At the beginning of the week I glued them, but it wasn't working and that's when I borrowed the sewing machine.  I stitched all the way around them and just frayed the burlap when I was done for a fringe.  I was actually amazed at how I was able to get the pillow in nice and snug.  I thought they needed something so I went through some jars of buttons that I've had for 25 years.  I bought them in plastic bags at a garage sale from an old lady who saved them for years, so some could be I don't know how old!


Found the perfect buttons, and also a key so I sewed that on one too.  I cut the bottom of a coffee sack off to make a lumbar pillow.  Only had to sew the top as the other three sides were already stitched.  But I guess you're not suppose to stitch the whole thing shut otherwise how the hell do you get the stuffing in?  So I ripped a corner back out and stuffed a bunch of pillow fluff in that I took out of an old pillow.  Then I glued the buttons on with the wrong side showing (on purpose) because I liked the vintage writing on that side of the metal buttons.


These sacks are the softer burlap not like the ones I used on the valances.  I also sat outside on the porch to fray the edges so I didn't make a mess inside this time.  But I was in my jammies.  I looked up a couple times surrounded by coffee sacks thinking maybe Juan Valdez and his donkey would show up. 

Tonight I went grocery shopping and stopped at the farm store just to see if there were still some coffee sacks left.  I bought 8 more.  They cost a whole $1.28 each.


This one is my favorite.


Linking up to Pillowpalooza @ItAllStartedWithPaint 
Cow Girl UP Party @ CedarHillRanch
Restyled Sundays @StylishOnceAgain
Stinky Linky Thursday @HatingMartha 
Friday Free for All @ FiveDays5Ways 
Tuesday Link Party @ TalesOfATrophyWife 
Saturday Link & Greet @ CountryMommaCooks

Follow on Bloglovin

Sunday

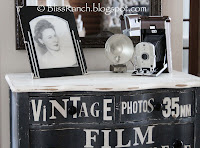
My Kodak Moment Dresser

Yesterday I was in a funk.  An unmotivated, too much to do, foggy funk.

Kodak Dresser, Bliss-Ranch.com
I had a to-do list, like scrub the toilets and floors, so I was avoiding it. 

A wise blogger reminded me that the last time I was in a funk I got creative with the Rock 'n Roll Dresser, so I decided to work on something that wasn't on any list.

Kodak Dresser, Bliss-Ranch.com
Simple and white Before

Follow on Bloglovin

Friday

Bliss Ranch Master Bath


That cute little brunette is me.  About 25 years ago.  
I lied.  Just in case you are skimming and not really reading, I said...... I LIED!   
I have to confess, I don't want anyone thinking that is me.  (Well really, yes I do).
So it's not me, but isn't she a cutie?  That's Holly from the blog Bella Nest.  
If you want to see some of the Bliss Ranch master bathroom, 
click on over to Bella Nest where I have a guest post today.
While you are there snoop around and see what Holly's got to offer.  
I guarantee she won't be putting a picture of me up saying it's her!


Follow on Bloglovin

Monday

The Little Engine That Burlaped

Is burlaped a word?  Some wise blogger said that if you write it in blogland it becomes a word.  So mine is burlaped.  Or maybe it should have two p's?  Burlapped.  Sort of French sounding when you say it that way.... buur'lapped.  What ever.  I hate burlap.  I hope to not burlap often.  But I love burlap.  I love everything I see buur'lapp on.  I hope to have it on many more things.  Versatile, quaint, country, chic, all rolled into one adorable fabric.  Fabric of fraying messiness, little fibrous pieces of smelly textile.  I hate burlap.

Coffee sacks.  If you are lucky a few green coffee beans will fall from the seams when you cut into them.  If you are doubly lucky you will have mounds of thread-shred-shed all over you, your floor, your dining room table, and everywhere else the stuff walks off too.  If you are smart you will do this on a sunny day outside.  No comments please about me not being smart, it was a weather issue and you should know by now I like to work on the dining room table anyway.

There is a tremendous difference in the weave, texture and feel of burlap coffee sacks.  For this project (what is the project you wonder?) I wanted to use the lighter colored sacks, which were the looser, coarser variety.  They were all clean and flat when I bought them.  I washed them to get the smell out and it turned them into mangled twisted, sacks of lettered wrinkle.  They didn't even smell till after I washed them.

Draw Straight lines


I do not sew.  I found out this weekend I don't even cut or glue all that well.  Math, forget it, I measure by using from my elbow to my wrist.  Works.  Sometimes.  Usually not very accurately.

Donna over at Funky Junk always has ideas I think I can do.  She makes stuff look "Bliss-able".  Her faux shades were the perfect no sew project for me.  I chugged along, uphill, and got it done.  Chanting "I think I can, I think I can" when I was up to my elbows in math calculations for cutting and lining 5 shades that should of all been of equal size.  For the full tutorial go to Funky Junk and do it the way she says.


Easter weekend I found myself in a farm store staring at a bin of coffee sacks.  $1.29 each, some are two sided, bonus!  I had no intention of making the valances from Funky Junk even though it was love at first sight, but that was because I didn't own any coffee sacks.  Now there they were and I bought 8 of them.  3 have been cut up for five windows above our kitchen eating nook.

 The blank canvas, of which I have five of the same size.


My hot glue gun was crap.  Yes crap.  So I used fabric glue.


The evil, mutant shredder. 


Terrific Under Ten Tuesday @ At Home With K 
It's A Party @ DIYbyDesign 

Wow Us Wednesdays @SavvySouthernStyle 
Whatever Goes Wednesday @SomedayCrafts
Show & Tell @BlueCricketDesign
What we made and wore @RaeGunRamblings 
The Mother Lode @ IGottaCreate 
What's It Wednesday @IvyandElephants 

 Time Travel Thursday @ Brambleberry Cottage 
 Crafty Scrappy Happy Me Thursday @CraftyScrappyHappy
 Thrifty Thursday @ ThriftyDecorating
 Transformation Thursday @TheShabbyCreekCottage
Share Your Cup Thursday with Mrs. Olson 
Party Time @ 36th Avenue


Follow on Bloglovin
BB
Disclosure Policy for Bliss Ranch:
From time to time there might be a written review of services or products on this blog for which Bliss Ranch may or may not have received that service or product for free. Receiving a product or service for free or at a discount will never dictate what is written on this blog or guarantee a favorable review. All opinions here belong to Bliss Ranch and Bliss Ranch alone. Bliss Ranch is not monetarily compensated to write anything on this blog... period! For the complete privacy policy please see the tab at the top of the blog.