Monday

Martha Stewart Silhouette Windows - Thrift Store Version

Last October I decided to make my version of Martha Stewart window silhouettes.  I followed her tutorial here.

Well, I kinda followed it.

Actually... just now reading through her tutorial, I didn't really follow it, so I think it would be better to say her windows were my inspiration.


I love me some Martha but I think Ms. Stewart over complicated the process, plus she had more time and money than I did - she used chiffon over her fabric.  My windows were not for inside my house or to be seen by neighbors from the road.  They were to use in our back shed for a party. 

The Martha-Stewart-Bliss-Version-Window-Silouette-Tutorial

1.  White sheets.  I stumbled on half price day at the thrift store.  Picked up all the old white top sheets they had.  Think it cost me $3.00, I have extra.
2.  Get old windows.  Mine - 100 year old ones from our old barber shop building.  I used some that had divided glass, some without.  Cut the sheets to size.

3.  Have a talented daughter or husband who can draw things free hand, then all you have to do is slop paint between the lines.
4.  Buy cheap dark gray interior latex paint, or do like I did, get the really cheap black paint and add some white till you get the dark gray color you want.  Do not paint on the sheet while it is directly on your dining room table.  The paint will bleed through.
5.  Let dry a good long while so it doesn't smudge.
6.  Staple gun it to the back of your window.

My way allows you to skip Martha's whole template enlargement and grid thing.  Which just seemed like drawing it twice anyway.  But if you want your template enlarged by all means follow Martha.  My template is plenty large already thank you very much.

This ghost window was behind junk yesterday, but it was hanging in the window so the ghoul was glowing from the sunshine. The others are just hanging up behind the glass. 

This is what they look like with lights behind them, in this case some pumpkins and moonlight.


Before the Sheer Curtain
7.  While at the thrift store, also pick up some yucky haunted house looking window sheers to use as your curtains.  
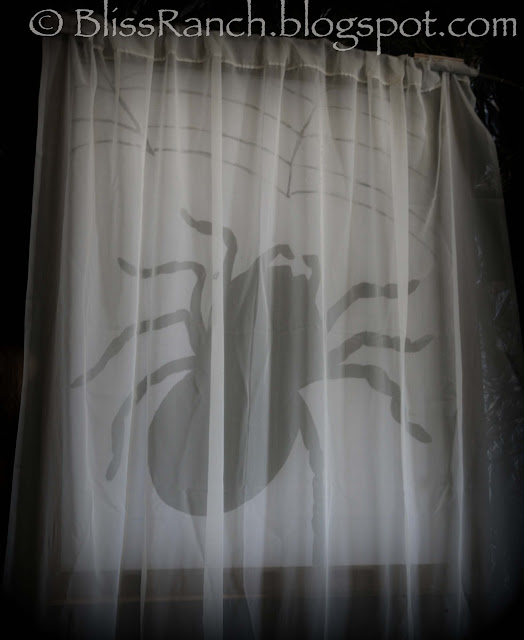
After with the sheers in front

The idea was to create the illusion of being inside the haunted house looking out at the creepy things in the night.  The sheers were hung on branches, because branches are free and curtain rods are not.  The sheers were long and they dropped down behind our food table.  We evenly spaced them along that wall and experimented with what color bulbs to hang behind them.
I should mention these windows were heavy and big.  And yes those are suitcases on the food table.  Sorry the photos are not up to snuff, they were back in the olden days 2011 BB (before blogging).


Getting Creepy at:
Newbie Party with a Twist @ DebbieDoos
Craft O Maniac Monday @CraftOManiac
 What's In The Gunny Sack 
Mod Mix Monday @ ModVintageLife 
Make It Pretty Monday @ TheDedicatedHouse 
Make the Scene Monday @ AlderberryHill 

 Tuesdays Treasures @ MyUncommonSliceofSuburbia
 Nifty Thrifty Tuesday @ Coastal Charm
 Knick of Time Tuesday with Angie
Be Inspired @ Elizabeth&Co. 

Overflowing with Creativity @ItsOverflowing
Sunday Showcase Party @ UnderTheTableandDreaming 
Pinworthy Projects @JustUsFour 
Tutorials & Tips Link Party @ HomeStoriesA2Z 
All Star Block Party @InTheOldRoad & FullCircleCreations 
Cowgirl UP @CedarHillRanch 

Live Laugh Linky @LiveLaughRowe 
Potpourri Friday @2805 
Tutorials Tips & Tidbits @StoneGable 
Happy Hour @ CraftyScrappyHappy 

Show and Tell @BeDifferentActNormal


Windows featured at:
Made in a Day 
It's Overflowing

MyUncommonSliceOfSuburbia

Follow on Bloglovin

Ghost Gang

So when I last left you I was getting creepy.  Creepy to me isn't cute.  You might think the little ghost gang is cute, I think ghosts are creepy, a traditional Halloween creepy thing.  Spiders are way creepy to me.  Witches are creepy.  Birds are creepy.  Bloody ghosts and spiders eating people is not creepy, that's gross.  Well maybe spiders eating people would be creepy, I'll think on that.  I like creepy.  Not gross.  In other words, I like my witches ugly.

11 months out of the year I am a regular bleacher sitting God fearing mom.  But something comes over me in October.  I do not like to be scared.  But I LOVE to scare other people. 

Meet my kids.  It won't be what you are expecting.  Maybe some time I'll put up some photos of my good looking gang.  They have gotten a bit taller then these toddling ghosts.

One of my two daughters.  She is wearing her original little pants and shoes.
Just like her 5 siblings below.


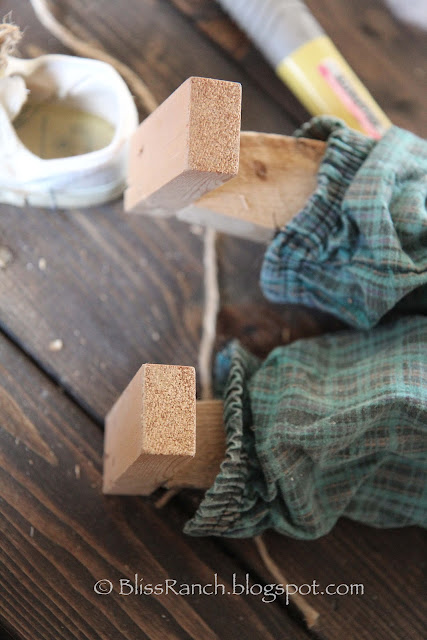
Six little trick or treating ghosts line my entry way every year all dressed in clothes my kids actually wore.  I had to take one apart this year to fix his shoes and restuff his britches, so I took a couple photos of how easy these are to put together.
Little Footie form
They are a simple wood form, use what ever scrap wood you have laying around because I know that's what Brawn did.  Yes one of my son's had wild little plaid pants.  They were popular in the 90's.  Remember Zubaz?  Started here in Minnesota.  Remember the wrestling duo the Road Warriors who wore Zubaz?  Also from Minnesota.  One of those is making a comeback, you decide which.  These plaid pants are not Zubaz, I couldn't put the prized little zebra pants on a ghost.  I should have.  The whole family had Zubaz.  Cracks.  Me.  Up.

I thought about updating the ghosts and had some good ideas, but four of them were made 17 years ago and it didn't seem right to change them now.  We added the last two ghosts as we added more kids.  So I just dust them off, pull up their pants, knock the stuffing in their heads around, and they're good to go. 

I also baked last week.  The Crow is ready to devour this piece of cake.  I'll tell you what Pinterest cake was a huge hit next time.  So much so I made 3 of the same cake within 7 days.

Today's costume installment,  a Witch Doctor, or Head Hunter.  Witch-ever.  Real fur coat sleeves as leg warmers and hat.  Yes those are real bones.  How did a bone get attached below my nose?  Super glue of course.  A very very very small dot, worked perfect.  In case you are thinking you didn't read that right... yes I super-glued a real bone under my nose


Newbie Party with a Twist @ DebbieDoos
All Star Block Party @FullCircleCreations 
Wildly Original Link Party @IGottaCreate 
Halloween Spooktacular Link Up @MadeInADay 
Creative Inspirations @EmbracingChange 
Party @ 36thAvenue
Live Laugh Linky @LiveLaughRowe 

The Ghosts were featured at:
Full Circle Creations

Follow on Bloglovin

Friday

Halloween is for the Birds

So today I started to get my creepy on. 

Lest you think I ran out and bought birds because ravens are all the rage, let me show you a thing or 25.

Those black birds are expensive at this time of year. 

So lets say last year you needed a whole flock... I don't know.......... maybe so you could sew them on a dress and resemble someone from an Alfred Hitchcock movie or something bizarre like that.  You might find white wedding birds really cheap by the dozen and order those. 

 
And those pretty white doves and love birds... well if you spray paint them black they make a decent looking ravenous black bird.

And then the next year you can spread them around your house, you know, use them in your creepy decor, a'la Hitchcock style.


If you happen to have a bird dangling a plucked eyeball by a tendon, along with a skeleton head missing an eye - great - they will compliment each other.
 
Why yes.. yes.. that is my cheese-dome-faux-cloche (of which I now own three) glued onto a candle stick, and some free readers digest books with their covers removed.  I know what you are thinking ...... my how crafty of you Bliss.  I used the spines in a craft too.  That would be BOOK spines, I'm not that creepy.

Plucked eyeballs are about as gory as I get but there is no limit to what I find creepy.

Now forget you saw this woman, or you might want to pluck your own eyeballs out.  If you look to the top right, it's hard to see, but one bird has this poor ladies hair in its beak.  On the left side the darn blackbird has plucked out her eye leaving her with an empty socket and little bloody bird claw prints on her dress.  She won't be wearing that again, they pecked right through that 80's dress.  Those birds must be revenge seeking friends of the crapping quackers that live at the ranch.  But isn't that the cutest little vintage purse?


Follow on Bloglovin

Wednesday

Recycled Name Plate Food Tags

Food tags from old desk name plates


Turn Tim Harrison into Food Tags


As I'm digging through bins of stuff I found these food tags I made last year, you know BB (before blogging).
Simple project.....
Bliss's Half Azzed Tutorial:
I got some old name plates at a garage sale
Slide out the name thing (that is a pirated photo, I do not know Tim Harrison and I do not own that photo).  You have to use the other side of the name plate because the front side is engraved so it has indentations where the name is.
Ask someone handy to cut them all in half - the name plates and the metal stand.
Paint chalkboard paint on the smooth side
Spray paint Hammered Copper on the metal part
Done

And the reason I'm spending less time right now at the computer and more time staring out my windows........
The View at the ranch
(I should be on the other side actually washing those windows!)


P.S.  This is my busy season, but I want you all to know I haven't sacrificed reading blogs.  I climb into bed with my Ipad and still read all million that come to my email.  However I'm not commenting as much right now.  It's just important to me that you know I'm still there with 'ya and the stuff you all make and write amazes me. 

P.S.S.  That big old dresser in the first photo is sitting in my entry way after it's redo from HELLLL over the weekend.  When He-Man and She-Ra have time they will move it to it's new home and She-Ra will blog about it.


These Tags are partying at:
Wildly Original Party @IGottACreate 
 My entry into No Minimalist Here Open House Party  sponsored by Appliances Online


Follow on Bloglovin

Saturday

Little Forgotten Desk


It's a small one.  And a cheap one.  This desk set me back a whole buck at a garage sale last May.  I had intentions on turning it into a craft spot for two adorable kids.  As small as it was it wouldn't fit in my daughters car, so I called my son a few blocks away and he came and loaded it up for me.

Then I forgot about it.

One day in August he said "hey mom, you wanna paint that desk for me?".

What desk?

The little desk went to his house, in his vehicle, and he claimed it, working outside with his lap top on it all summer.  It was nothing fancy and that's why he liked using it outside.

So in August it showed back up at my house, the desk I forgot I owned.  The buck desk.  Waiting for a paint job so it could go back to my sons house for him to use.

The before photo is half painted, because I always forget to take one till I start.  (No... really I remember, I am just too lazy to go fetch the camera).  It was all raw wood or something that resembled raw wood.  It was a buck, who cared!


Dark Walnut on the top and front drawer, ASCP in white followed by some distressing and dark wax, yard sticks for drawer pulls, a pants hanger for bills, and within a day it was back in his vehicle heading home.  His home.


I didn't really have room for it anyway.


A buck well spent.  The chair was .50¢ as is, but that didn't go to his house.  I remember I own it because it's in my garage taking up precious space.


I was mostly impressed that I painted it outside instead of in my entry way.

Moral of the story...... offer to take my stuff home in your vehicle.  I'll never remember and then it will become yours.

~~~~~~~~~~~~~~~~~~~

 If you get a chance stop over at Meridian Road where I have a guest post while Suzanne is off weighing sugar beets.  She has some great projects and was my inspiration for Dr. FeelGooder's first aid kit.

Old Photo Valance Guest Post @ Meridian Road
Linking the Little Desk to:
Make the Scene Monday @ AlderberryHill
Junking with Joe @TheCottageMarket

Follow on Bloglovin

Wednesday

Operation: Fall Chores

Around Bliss Ranch there are plenty of fall chores to take care of before Winter arrives.  Because our Winter is cold.  And full of snow.  Grrrr..... so depressed now.

The Chore Doctor

Anyway, it's not like anyone jumps up on the weekend and says "HEY let's go rake those beautiful Autumn leaves mom".  And...there is this Random Act's of Craftiness challenge going on over at His and Hers.  And.... my craft is random that's for sure!

So I have combined the challenge of getting the leaves raked
with the link party challenge at His and Hers.

The challenge:  This is the first month and a mystery item is revealed for participants to make something out of.  The item.....  game parts.   Has to be original.  As far as I know mine is original and I'm using "parts" all right.  Go check out the challenge, a gal can even earn a ribbon for a big fat FAIL.  Wonder if a big fat guy counts?


I started with this naked man.  Because really who doesn't like a naked man in that portly shape with all those ailments?  We'll call him Milton.  Milton Bradley.

You will notice Milton is not anatomically correct and neither is my redo.  Milton's skeleton 'bread basket' isn't anywhere near his stomach.

Operation:  Turn naked man into fleshless skeleton

I got my craft thing going on - really quite funny if you were watching me.  I turned a naked man in need of hospitalization for his ailments, into a Fall chore chart.  Have you ever considered that?  I didn't think so.

Remove his wrenched ankle?  You get to pick up the tools inside and outside of the garage.
Take out his Adam's apple and your job is to pick the rest of the apples on the tree and toss the ones on the ground to the chickens.
Water on the knee........ clean up the pool area.
Spare ribs....... choose what goes on the grill as a reward when done.
Broken heart...... pick up all the broken toys/junk and haul it away.
Charlie Horse....... get the ducks and chickens winterized.
Writers cramp...... RAKE.
Etc.

Moms Cheshire Pumpkin Grin

The rule is everyone plays.  Draw a card (the originals from the game).  Remove the body part that the game card directs and check the corresponding sheet of paper for your chore.  Doesn't even matter if you make his nose light up, in fact it's encouraged because then you get two chores.

Played every weekend till it snows or the chores are done. 

Operation Fall Clean Up

Everyone Wins!


Operation Party-Link here:
Random Acts of Craftiness @HisandHers
Wildly Original Bewitching Fall @IGottaCreate 
All Star Block Party @FullCircleCreations

Follow on Bloglovin

Glass Globe Pumpkins


Fall.  I  love  it.  Not just a little,  a lot.  

I don't usually start to decorate till October, and when I do it normally has a spooky twist.


Follow on Bloglovin

Monday

The Little Chest Redo

Updated Toy Box, Bliss-Ranch.com

I picked up a little chest at a garage sale filled to the brim with toys. 

The lady said she didn't feel like picking through all that tiny little tykes playhouse furniture so just sold the chest with the toys inside. 

She apparently didn't know people buy those 80's toys on Ebay for several times the original cost.

But I did. 


Follow on Bloglovin

Saturday

Scarecrow

 A few years ago, six apparently, in 2006 BB (Before Blogging), I decided to make a scarecrow.  I took a few photos of the process, but not a full tutorial like maybe would be nice for ya'll or you all as we say in the North.  I think at the time I planned on making two and wanted pictures to refresh my memory of the process.  

Meet Punkin Noggin.....


Punkin Noggin started out a semi round form of old rusty chicken wire. 
Yes even six years ago the rule was don't buy stuff to make stuff.


Can you see that chicken wire?  It's right in the center there next to the trashcan.  We have a brown trash can now, maybe it would blend in better.

You make a round form with the chicken wire and then balance it with wood shims nailed to your work place so you can work on all sides.  His melon gets pretty heavy.

The long paper thing at the bottom left will become his stem.

You start to mud him.  It helps if you know a drywall contractor who happens to keep drywall mud on hand, because when you want to make something you want to make it NOW. 

But you don't get to use the regular premixed stuff.  No you must use the dry kind you mix with water, it's called something technical like 20 minute mud.  At least at our house.


Mix up your goo in a old sheetrock screw bucket if you have one, and use that goo like paper mache.  Dip strips of fabric (I used old sheets cut up) and put it on the chicken wire.  Let dry, do again, and again until all the chicken wire is covered. 

Then you just keep smearing mud on fabric and shaping it as you go and eventually you get a gray blob resembling some sort of alien gourd with a stem that resembles a super size umbilical cord.  The stem is a metal clothes hanger with newspaper twisted and taped on.  You mud that too.  If I recall there was also some duct tape involved here somewhere.

Now you might want a beautiful, perfectly shaped pumpkin...... I did not.  I wanted to put a bit of the scare in the word scarecrow.  Halloween has never really been cute to me.... I'm the girl who wanted to be a witch year after year, and I was very afraid of witches, had nightmares about them.  Guess that's what's called facing your fears at a young age.


His body consists of grape vines from the woods and an old trench coat from a garage sale that I ripped up.  It was recycled from a costume.  No, no one was a flasher at Bliss Ranch.  Instead arms were flung open with the statement "wanna buy a watch" fully clothed underneath.

All the vines are twisted around a wood "T" and staple gun staples were strategically shot in, to hold it in place.  The whole thing was sprayed with varnish to protect it, and the head has about 10 coats brushed on so it wouldn't get mushy left out in the elements. 

Must of done something right because it has weathered 6 Octobers.

Now that I'm a blogger, I suppose if I was making another one, I'd probably have to use chalk style paint and wax it.

Brawn taking my friend for a walk down to the end of the driveway where he was put on a metal pole.  Punkin Noggin, not Brawn.  This is a good view of the stem and top and you can see how big he is.


Punkin Noggin.  He's outstanding in his field.


Punkin Noggin is gonna get you at these parties:

DIY Pumpkin Projects with Donna @FunkyJunk

Make the Scene Monday @Alderberry Hill 
Sunday Showcase @UnderTheTableandDreaming 
Cowgirl Up Party @CedarHillRanch 
The Style Sisters 
Fall Party @SarahDawnDesigns 
My big headed punkin is haunting at
The Primp your Pumpkin Party with Debbie Doos,
Fox Hollow Cottage Doos,  and Mom 4 Real Doos
BOO!

Follow on Bloglovin
BB
Disclosure Policy for Bliss Ranch:
From time to time there might be a written review of services or products on this blog for which Bliss Ranch may or may not have received that service or product for free. Receiving a product or service for free or at a discount will never dictate what is written on this blog or guarantee a favorable review. All opinions here belong to Bliss Ranch and Bliss Ranch alone. Bliss Ranch is not monetarily compensated to write anything on this blog... period! For the complete privacy policy please see the tab at the top of the blog.