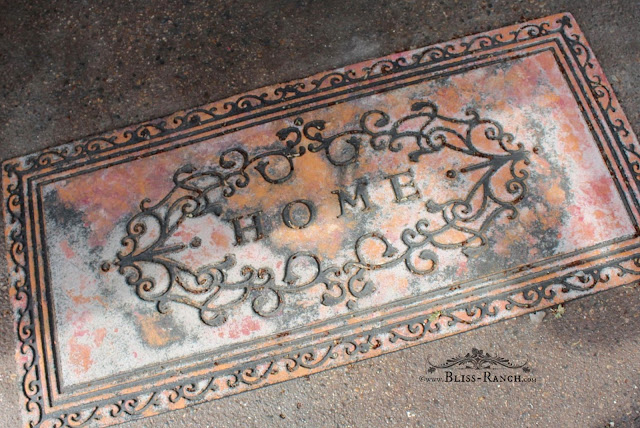
Just shy of two years ago I got a wild hair not to part with any cold hard cash for a new front door mat. I didn't know then, that my thrifty welcome mat redo was going to become one of my most popular posts.
So recently when I got a new question on the refreshed door mat post asking how it had held up I decided before I responded I better take a good look at the mat.
For this months Thrifty Style Team I will revisit how I refreshed that door mat.... for the second time.
Painted two years prior the mat had held up better than the original finish I bought it with when the mat was brand new. That one only lasted a year.
I thought the update looked really good for almost at the two year mark when I did a mental comparision. But then when I really looked at I could see that after going through a couple winters and summers that it might need to be refreshed..... again.
The paint had worn off in some spots so the black mat was showing through, plus it wasn't as bright and happy as before it saw it's second winter of ice and snow.
I got out a similar group of craft paints in shades of red and orange, cut a small piece of regular household sponge, and started to dab paint, concentrating mostly on all the spots that had worn off.
The mat is still solid. It isn't flaking away anywhere, so I guess it was a good mat in quality, just not in the wear and tear on the finish. The mat must be 5 years old now, maybe older and I like it mostly due to it's size - it is a big x inch mat.
Above is a photo of the first redo, and below the current one.
This time around it looks like I added more reds and less of the peach and orange. Either way I think salvaging the mat was an easy solution to tossing it. I also sprayed an additional coat of the sealer on it which will assure that it looks good this whole season.
The original post prompted some of my thrifty readers to try their hand at painting their own mats. You can see their creations in a separate post {here}.
My daughter also gave her mat an update using different tones of Fusion Mineral Paint.....
Really, for the price of some daubs of craft paint and a $2.97 cheap can of clear spray sealer, the 20 minutes I spent on the mats second face lift is well worth getting another two years of life out of it, and pretty darn thrifty as well.
I've got one more old worn out mat that is still in solid shape for wiping feet, I think I will try to duplicate the colors on the earthy mat above.
Or maybe suggest my daughter bring her painted door mat over if it needs a refresh, then after she gets all the paint jars out, casually slide mine next to hers so I'm assured it will look as good as her stone look from the first time.
Here are the links to the rest of the Thrifty Style Team -
they've
always got practical ideas to get the look you want by styling the
thrifty way!
Quick Links:
Visit the other Thrifty Style projects from Bliss Ranch....
Easy Spray Etched Metal Door Makeover
Easy Spray Etched Metal Door Makeover


Lookin good!
ReplyDeleteI always thought this was a cool idea. After I get the house painted, I may try it with mine!
ReplyDeleteI love it! I'm coming on over to wipe my shoes on it to test it out, ok? I'll bring the wine! ;-)
ReplyDeleteThis really is a great thrifty idea...you have gotten so much use from this mat, and it looks like it will just keep on going!
ReplyDeleteI remember this. I can't believe it's still holding up. That's a well made mat. Love the refreshed look!!
ReplyDeleteWhat an awesome thrifty idea to upcycle a doormat! One of my doormats is a dated color and I was getting ready to throw it out - not any more! :)
ReplyDeleteSuch a great idea to revive something that's still very useable. Paint can do wonders. :)
ReplyDeleteBliss, I am obviously buying the wrong door mats. I seem to have to replace them yearly. Going to look for one similar to yours!
ReplyDeleteI love the colors and the AMAZING idea.
ReplyDeleteYou have the best creative juices.