Monday

Wood Spool Christmas Tree & Link Party

Wood Spool Christmas Tree Bliss-Ranch.com
Hold on to your tinsel folks, 
this post is packed full of Christmas cheer!

Wood Spool Christmas Tree Bliss-Ranch.com


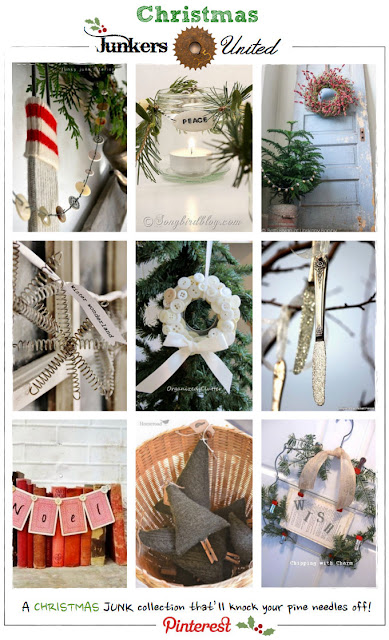
The Christmas Junkers United Team and the 12 Days of Christmas bloggers are combining for Day 2 with holiday inspiration and Christmas junk.

So many ideas, 
you won't need your eggnog spiked to make your head spin!


My creation is an upcycled, recycled, junktastic project......

Remember these spools my son in law brought me this summer?

One of them has been taken apart.  Cut to shreds.  Sawed in half.  Just like magic.

Husband magic.


The spool top received a masking-tape tree shape and the Brawn of the operation took pity on me and got out his DeWalt reciprocating saw to cut the tree out.

As I repeatedly thanked him, the only instruction I gave was not to make a perfectly shaped tree.
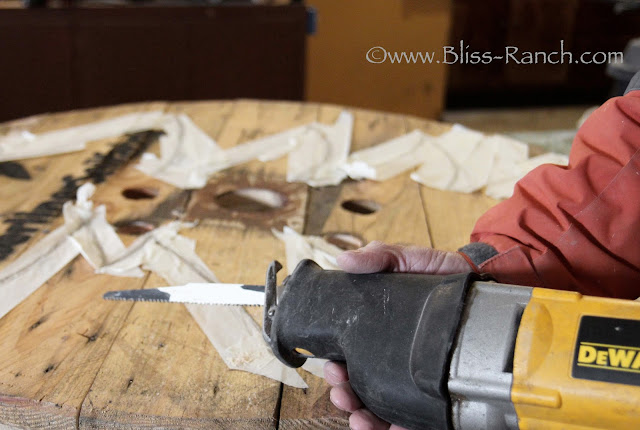
Wood Spool Christmas Tree Bliss-Ranch.com

The spool is about 2 inches thick.  I'd still be at it if I had to cut it myself.  Probably minus some digits or with a gash in my thigh.

I gathered some junk and sort of made up the whole thing as I went along.

These are some heavy solid glass bottle stoppers.  I wrapped wire around them to hang on the tree ends - my version of icicles.

Or would that be junkcicles?  Glasscicles?

I know... they are re-cicles!

Glass Bottle Stoppers Upcycled to Icicle

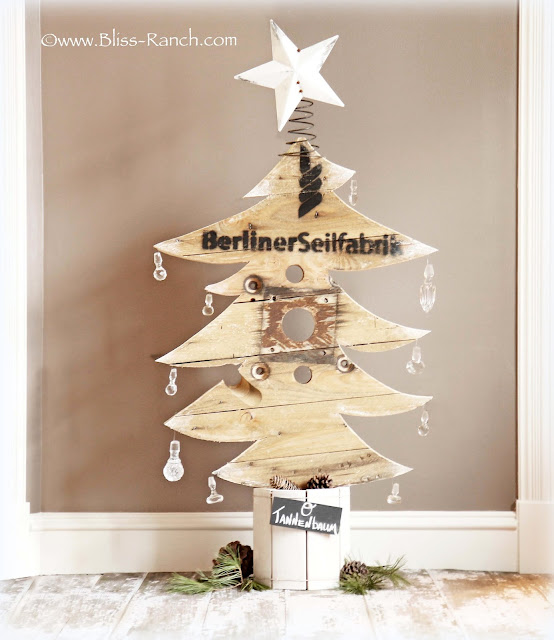
This tree is big...... from the base to the top of the star it's 5 feet tall.  I'm just an ornament or two taller.

Wood Spool Christmas Tree Bliss-Ranch.com

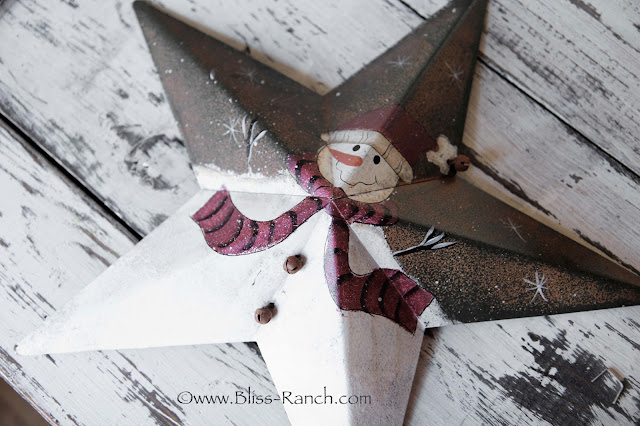
My oldest daughter collects snowmen and I picked the .25¢ star up at a garage sale for her.  Don't tell her she can't have it now.


I painted it white and left some of the rust color showing through.

An old bed spring is stapled to the tree top and the star is wired on.  I left the little bells on, because like I said, I was making this up as I went.

Upcycled Tin Star with Bed Springs Bliss-Ranch.com

To celebrate Brawn's German heritage, the tree got a little O Tannenbaum chalkboard.

I'm not German, I'm Irish.  For me it's O'Tannenbaum.  Get it?

Wood Spool Christmas Tree Bliss-Ranch.com

The base is made from the center of the spools, cut down to size, which I coated with a white wash and I also hit just the tips of the branch ends to clean my brush off.

Totally recycled.....
spool, bed spring, star, and glass bottle stoppers, turned into a rustic 5' Christmas tree.

Wood Spool Christmas Tree Bliss-Ranch.com

I thought about adding some vintage glass ornaments I bought this summer.  In fact, if I ever find them I will probably do just that.

I spent as much time looking for those darn ornaments as I did putting the project together.  Don't even ask if I'm mad that I can't find them.

The tannenbaum will probably move to the front porch.  Can't you just picture it outside all sparkly and cozy surrounded by piles of soft billowy snow, it's white lights illuminating our entry?

Are you insane?  I am NOT counting the days till it snows, and if it held out till December 24th I'd be happy.

Wood Spool Christmas Tree Bliss-Ranch.com
O Tannenbaum, o Tannenbaum,
wie treu sind deine Blätter


A spool top Christmas tree isn't all I've got for 'ya, no siree! 
There is a whole lot of holiday cheer being spread around the ranch today.  
Different than the usual 'stuff' I spread around.


If you want some wonderful inspiration for the season, 
take a peek at the Pinterest Junkers United Christmas Pin Board

Junkers United Pinterest Board


The 
just might have 12 projects too... 
they are 12 elves each rolled into one, 
and leave me in the glitter dust!

Angie - Knick of Time


PLUS the 12 days of Christmas bloggers have a new post each day 
for 12 days which means at least 12 ideas each to make your holidays bright.  
Lets do math....  if I'm correct (and I rarely am with math) that would be 144 ideas.


That's a lot of junk to be inspired by,

so follow along with everyone.
 

And last but not least, it's time for the

 Junkers United Christmas link party. 


 We will be pinning our favorites to the Junkers United Christmas Pin Board
where 47,000 of your best friends can see what you have created.


I've rolled the old wood spool over to these link parties:
Christmas Extravaganza Party @TwoTwentyOne


Follow on Bloglovin

Thursday

Chicken Wire Light Shade Covers

I've got a new joke for you.....Did 'ya hear the one about the blogger and the dining room chairs?  No?  Well I'm not telling it to you either.  Lets just say things are not going well with the chairs and my attempt to recover the chair backs.

So far I have hammered holes from the tacks into my kitchen counter, and burned a pillow case with the iron. 

Not only did I burn the pillow case, I also pulled up the wax and wood grain design from my dining room table top.  Don't. Ask.


If anyone needs to make a faux wood grain on Egyptian cotton, just ask, I'll be happy to share my technique.

To divert attention from whatever chair-redo hellll that I currently live in, I decided to finish up the dining room light fixture.


Follow on Bloglovin

Wednesday

Chocolate Caramels From Epicurious

Just let me make this very clear.... I am not a food blogger, do not enjoy documenting cooking progress nor do I like to rewrite recipes or take pictures of food.

~ Read that above line one more time and soak it all in. ~

I do however enjoy eating, and I know good when I taste it.

I also like to join in on link parties my friends host, and one of my decorating inspirations, Holly over at Down To Earth, is having a holiday baking party I want to be part of.


I have been trying for 10 years to perfect or find a chocolate caramel recipe that is as good as my butter caramel recipe.  Last year I gave yet another recipe a try.

It turned out to be "the one".

The one that is now in the lineup of favorite holiday treats to make year after year.  The one good enough to end the yearly search for a chocolate caramel recipe.


It has the perfect creaminess and a very distinct chocolate flavor.  I found the recipe at Epicurious.  It is a salted caramel recipe that I love, but my family doesn't like the salt on top so I leave it off.

The caramels do look more gourmet with the salt flakes, but I haven't had anyone feel slighted without it.

Look at that hot vat of bubbling cocoa goodness.  Mmmmmmmmm.

The only change I have is to NOT cook it to the temp they call for in the original recipe.  The original recipe calls for cooking to 255* on a candy thermometer.  I find cooking to that temp makes the caramel too hard.  I recommend 252 and no higher for perfect ones, at least in my kitchen.  Cook it right at 252 and when it starts to go above that, turn it off.


Unlike my butter caramels this one is a two step boil process.  A little more work, but after a 10 year search for the perfect tasting chocolate caramels, I'm not messing with a good thing because the outcome is excellent.

I will doubled the batch again this year, without any problem for the original recipe.


I use Ghiradelli 60% bittersweet chocolate baking bars.  I won't use another brand because these give me the taste I was going for.

Yummmm.......  I don't like overly sweet, I want to taste the chocolate not just a sweet something I can't identify.

I gift some of them, but usually my family asks me to hoard these for us.  Not very giving at the giving time of year are they?

Remember to stop in at Down to Earth and link up a holly-day recipe or one of the other hosts; Amy at Atta Girl Says, or Marty from A Stroll Thru Life.

For the full chocolate caramel recipe/tutorial, head over to Epicurious .... those folks don't mind writing out tutorials like I do.  I like to just get right to the best part....... the eating.  And these are excellent eating if you want to indulge.


Stay Tuned, coming soon, December 2nd to be exact......


Linking up the goodies at:
Holiday Baking Party @DownToEarth


Follow on Bloglovin

Friday

Cake Testers From One30One Design

What's a cake tester?  

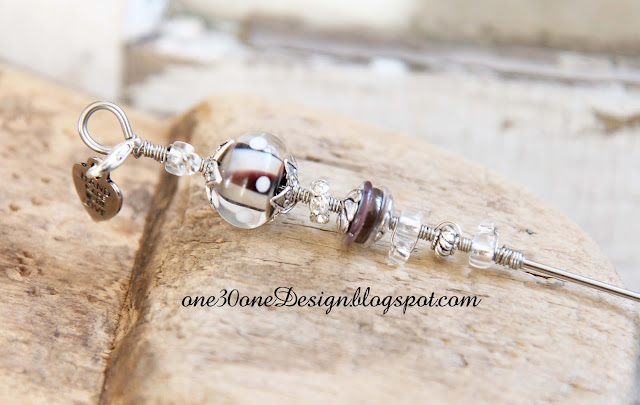
Cake Tester with Lampwork Beads by One30oneDesign

The human version of a cake tester is probably someone who must have the most amazing job on the planet if they get to taste test cake.  Brawn tells me I'm a "Supertaster" because he saw something on the Discovery Channel and decided his wife met the criteria.

I think I would be a good cake taste tester.

Cake Tester with Lampwork Beads by One30oneDesign

But in this post a cake tester is a beaded bauble of beauty used for testing if baked goods are done, specifically cakes.

Think of a cake tester as a grown up version of a toothpick.  Very grown up.  They are referred to as "kitchen jewelry".

Cake Tester with Lampwork Beads by One30oneDesign

The fancy beads are known as lampwork.  A glass artist twists long glass rods over the flame of a torch, similar to glass blowing.

Cake Tester with Lampwork Beads by One30oneDesign

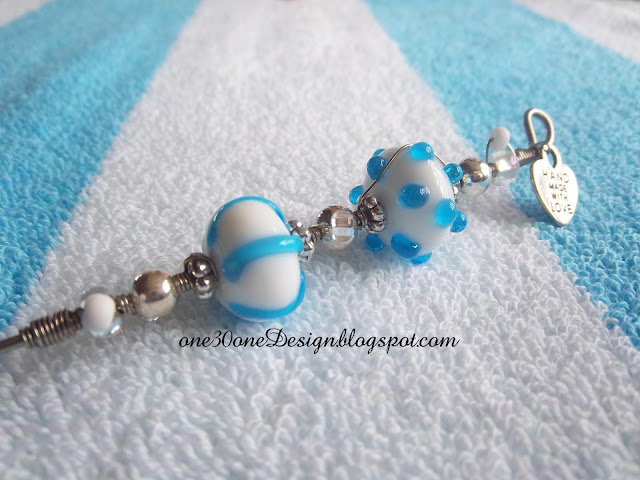
The beads on the cake testers are solid, not hollow bubbles, and they come in various sizes.  The small beads are all glass as well.

The rod is food grade stainless steel direct from the manufacturer.  That little hook at the top is hand bent and each piece of rod is hand cut.

Cake Tester with Lampwork Beads by One30oneDesign

Sometimes faceted fire agate beads are used for a more earthy natural look.  I give them as a gift to the family holiday meal hostess, with a cookbook for a bridal shower, or tucked in a gift basket.

Cake Tester with Agates by One30oneDesign

I have seen some imitations.  Made on cheap wire that bends, a hat pin, or a squared bbq skewer.  Don't fall for their cheaper prices.

Cake Tester with Agates by One30oneDesign

One 30 One Design has made over 300 of these things - on Etsy and for fine local shops.  Read the feedback in the Etsy shop.  100% positive.  You don't get that sort of comment love for nothing!

Cake Tester with Lampwork Beads by One30oneDesign

Everyone says the same thing..... that they love their cake tester or the recipient loved it.

Cake Tester with Lampwork Beads by One30oneDesign

They are beaded nice and tight.  Some folks say they are too pretty to use.

I say nonsense, I use mine all the time.

Cake Tester with Lampwork Beads by One30oneDesign

Packaged in a box with shred for easy gift giving.

And it is that time of year.  Gift giving time.

These cake testers are unique, one of a kind gifts.  No one else on the block will have one.  Although the designer would love it if they did!

Cake Tester with Lampwork Beads by One30oneDesign

One thing I know for sure..... the photos don't do them justice.


Cake Tester with Lampwork Beads by One30oneDesign

And because it's that time of year, and because I've got an "in" with the designer

I'm offering a coupon for the readers of Bliss Ranch.  
Buy 2 get free shipping.  
Use coupon code CAKEISBLISS.
Expires December 15th

You can read about the artist and her cake testers at One30oneDesign
or click { here } for her Etsy Shop.
I think she's something pretty special, just like her cake testers.


Follow on Bloglovin

Wednesday

Dining Room Chairs Post..... again!

One year ago this month I located the perfect chairs on Craigs List for a redo.....


Due to the time of year and being the hostess with the mostess*, two of these birds were purchased the same day as the chairs..... *FYI mostess auto corrects to moistness.


Thanksgiving arrived and the Butterball's were smoked on the grill....

the chairs were sat on as-is, and all was grand, as in grand plans to finish them.


Eventually the dining room was painted.  By now it was 2013.

and a new table was made......


Six chairs were taken apart.

Six chairs were painted (several times with different colors).

Six chairs were distressed, waxed, and buffed.

I wanted to gnaw off my arms so I would never ever have to do this task again.


The seat bottoms were covered with a deep espresso. 

One of them makes a funny noise when anyone slides off it..... I try not to sit on that one when company is here.


And then what happened?  Such a nail bitter this story is huh!

Let me tell you more.....


Two of these rustic-chicken-wire-backed-plate-holder-things were built, stained, hung, waxed and wiped.  Yes in that order.  Brawn doesn't wait around for me to complete my part of the job when he is ready to complete his.

Being the trend setter I am, they were finished with a re-rod plate holder bar.....


Drop cloth was purchased, washed, and cut to size for chair backs.

Round head tacks were left as is, the patina on them was perfect....
(that and there was no way no how I was polishing hundreds of them).


The awesome graphic for the chair backs was ready to go.....


Yes I realized I spelled correspond wrong, and no... I wasn't going to remake the whole little Picmonkey thing to fix it.  If I knew I was going to show the graphic again, well I probably would have.  I'm a good speller, but a bad proof reader.  Thankfully I caught the mostess/moistness thing earlier.

I picked up the transfer paper for the design in May on a drive back from a weekend away, with an emergency stop at Office Depot because I HAD to have that transfer paper before I got home and unpacked. 

Then what the helllllll happened?

Nothing happened, that's what.  Other than a year went by since I started these chairs and five months since I purchased the transfer paper that I'm hoping I can now locate.

Thanksgiving 2013 is about to arrive.  Two new turkeys have been purchased, 20 pounders this year if you want to know.

So with a new Thanksgiving gig to host, the chairs are fix'n to be finished at the ranch.   I'm telling you that in case no one hears from me while I'm knee deep.

I'm going in and I'm not coming out till they are done.


Follow on Bloglovin

Friday

Bathroom Redo Step #1 and Ugly Bathroom Contest

Why is this titled Step #1?  Well knowing how long it takes around here to get a project finished, I thought I better label it so I can keep track. 

Not that I started a dining room redo last year this time or anything.  I do have goals you know.... I intend to finish those dining room chairs before Thanksgiving.  I do, really, after all that would be a great way to celebrate their one year anniversary.


 The boys bathroom, home of the famous mailbox and railroad spike towel holder, is in the midst of a makeover.

Mid-mess
And this bathroom redo better be done this month too.  Funny how bossy I get when it's not a project on my plate.

Even though the bathroom redo is NOT my baby, one of my babies did decide to take it on.  He doesn't read the blog so I'll say it now..... there really wasn't anything the matter with that bathroom before, other than stinky socks and boxers always on the floor.  And towels.  I swear the boys use three towels each time they shower.


I liked the old wall color better.  It was just my usual shade of light beige.  I like beige, alright?  Don't smart off on the other side of that computer screen.  The new color is beige too, just a darker one.  I don't like it as much.

I liked all the old signs hanging on the wall.
I liked two sinks even though only one worked, and I liked two mirrors, just because I thought they looked nice all big and round.

Apparently the boys disagreed.


But I don't use that bathroom.  It's the boys bath and since one son decided it needed a redo and he was willing to do the work and pick out what he wanted, well I just shut up.

Ok, I didn't really shut up, that is one thing I don't know how to do.


So coming soon to a boys bathroom near me is ....

One poured concrete counter top, made by father and son.......


One new vessel sink......


One new Price Pfister totally cool faucet.......


And one mirror.  But what mirror is the question?  I would prefer the round one that was on the wall, but apparently to move it, it has to be smashed, they already moved, I mean smashed, the left one.  When Brawn fastens something to a wall, he intends it to stay.... forever.


And just as a coincidence, National Builder Supply is running an ugly bathroom contest with prizes or a complete bathroom makeover (click on the name to enter).  No I am not entering my bathroom, first of all it's not ugly, remember?

While you are there watch the ever changing list of partners in the box on the right.  Eventually you'll see something that says Bliss Ranch flash in front of you.

If you've got an ugly bathroom, get your photo ready (or if you've got one you like but your family decided to redo it anyway) and enter to win.  You can enter for prizes without having an ugly bathroom, but if you've got one of those load up a photo. 

I'm pretty fortunate .... I don't think any of our bathrooms are ugly or you can bet I'd be entering one for the chance at a makeover.  Contest runs for a month, so find the ugly and embrace it.


Follow on Bloglovin
BB
Disclosure Policy for Bliss Ranch:
From time to time there might be a written review of services or products on this blog for which Bliss Ranch may or may not have received that service or product for free. Receiving a product or service for free or at a discount will never dictate what is written on this blog or guarantee a favorable review. All opinions here belong to Bliss Ranch and Bliss Ranch alone. Bliss Ranch is not monetarily compensated to write anything on this blog... period! For the complete privacy policy please see the tab at the top of the blog.